Python Download & Install: Version 3.7.4
Step 1:-Download the Python Installer binaries
- Open the official Python website (https://www.python.org/downloads/windows/) in your web browser. Navigate to the Downloads tab for Windows
- Choose the latest Python 3 release. In our example, we have chosen the Python 3.7.3 version
- Click on the link to download Windows x86 executable installer if you are using a 32-bit installer. In case your Windows installation is a 64-bit system, then download Windows x86-64 executable installer
Step
2:- Run the Executable Installer
- Once the installer is downloaded, run the Python installer
- Check the Install launcher for all users check box. Further, you may check the Add Python 3.7 to path check box to include the interpreter in the execution path
- Select Customize installation.
1. Documentation
2. Pip
3. tcl/tk
and IDLE (to install tkinter and IDLE)
4. Python test suite (to install the standard
library test suite of Python)
5. Install
the global launcher for `.py` files. This makes it easier to start Python
6. Install for all user
Click
Next
- This takes you to Advanced Options available while installing Python. Here, select the Install for all users and Add Python to environment variables check boxes.Optionally, you can select the Associate files with Python, Create shortcuts for installed applications and other advanced options. Make note of the python installation directory displayed in this step. You would need it for the next step.
- Once the installation is over, you will see a Python Setup Successful window
Step 3: Verify the
Python Installation
You
have now successfully installed Python 3.7.3 on Windows 10. You can verify if
the Python installation is successful either through the command line or
through the IDLE app that gets installed along with the installation
Search for the command prompt and type “python”. You can
see that Python 3.7.3 is successfully installed.
Installing
PyCharm
- To download PyCharm visit the website https://www.jetbrains.com/pycharm/download/ and Click the "DOWNLOAD" link under the Community Section
- Once the download is complete, run the exe for install PyCharm. The setup wizard should have started. Click “Next

- On the next screen, Change the installation path if required. Click “Next”

- On the next screen, you can create a desktop shortcut if you want and click on “Next”
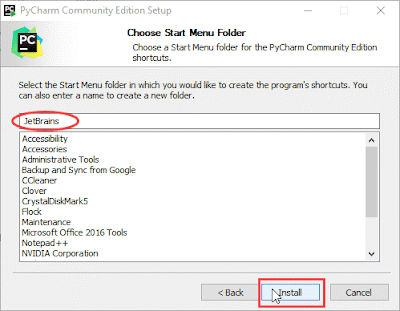
- Choose the start menu folder. Keep selected JetBrains and click on “Install”.

- Wait for the installation to finish
- Once installation finished, you should receive a message screen that PyCharm is installed. If you want to go ahead and run it, click the “Run PyCharm Community Edition” box first and click “Finish”.


